
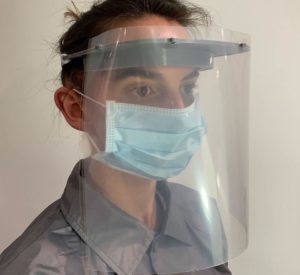
There’s a great deal of concern about shortages of personal protective equipment (PPE) for health workers due to the COVID-19 pandemic.
Fortunately, there are ways that all of us can contribute to lessening that shortage.
Health professionals need face shields that can protect both themselves and their patients. There are two ways you can help build them. One method simply requires materials that you can get easy access to, while the second method involves using a 3D printer.
NOTE: These are not FDA-regulated medical devices, and have not been manufactured to the same degree of sterility as face masks or other items that directly interface with mucous membranes. NewBoCo and all of its related affiliates and partners make no claims regarding the safety and efficacy of the PPE in preventing any disease or illness, including, but not limited to COVID-19. In utilizing the designs provided on Newbo.co, you are voluntarily electing to make the objects described. As such, by participating in this effort, you are releasing, waiving, and discharging releases from any and all liability, claims demands, actions, and causes of action whatsoever arising out of or related to any loss, damage, or injury, including death, that may be sustained by any individual or organization, while participating in these activities.
ALSO: Please do not attempt to make any PPE if you or someone in your household is sick. If you can, please segregate the tools and equipment that you will be using to make the PPE in your space away from people, pets, bathrooms, or food preparation surfaces. There is still debate about how long the virus survives on hard industrial surfaces, but it is currently estimated that COVID-19 can live on hard industrial surfaces (metal, plastic, and glass) for up to 3 days. Read our full disclaimer before proceeding.
NEWEST FACE SHIELD TUTORIAL: DISPOSABLE, NON-3D PRINTED VERSION!
This is the simplest, easiest way to build a face shield yet. It involves just three pieces and it’s great for building lots of face shields when you don’t have a 3D printer or parts available. We explain everything you need — and how to make it — in this video:
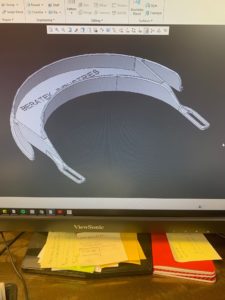
Face Shield 2: 3D Printed Version (Hybrid CRIA2020)
[DOWNLOAD STL FILE FOR VERSION 1.2 HERE]
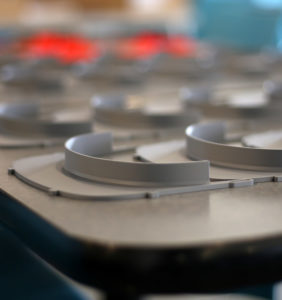
We built almost a dozen prototypes, landing ultimately on this one. It is necessarily a compromise, but focused on the feedback we got from numerous clinicians in Eastern Iowa across multiple organizations who tried and compared our prototypes. They liked this one for several reasons:
- Ease of cleaning and reuse – just take the shield off, remove the tape and throw away. Remove the elastic strap if you wish. Dunk/wash the shield and visor per your cleaning protocol. Tape the shield back on (and replace the strap).
- Easy to assemble – Heft – they liked that it had a bit of weight to it
- Comfort – the elastic band was worth the hassle of having to clean or replace it.
But it takes a bit longer to print, and uses more material. That’s a good tradeoff, in our view, if it’s better liked by clinicians in the field, and, importantly, is easy to clean and reuse as well.
We expect these to be used in slightly more demanding environments where better quality equipment isn’t available yet due to supply chain issues.
We will use higher-grade transparent plastic on these as well.
We will request that our 3D printing group focus on this unit where possible, until we have a better one. The files can be found on our dropbox here.
We are coordinating assembly and distribution of this model to crucial clinical organizations all over Eastern Iowa, probably of hundreds and maybe thousands of these if we can keep printing 24×7 until the supply chain catches up. Here’s a video tutorial on how to build them.
https://www.youtube.com/embed/on5zv11fFb8
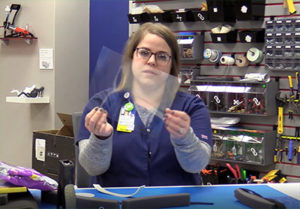
The visors are the 3D-printed part; we have a link to their files above. In addition to the visor, you will need:
- Double sided tape (though in a pinch, duct tape can work). We got ours from Lowe’s.
- Foam (optional; hard to remove for cleaning, so you may choose not to add it)
- Transparent shield
- Rubber band (or elastic if you have it, but we’ve run out at this point)
Assembly of this design is pretty straightforward. You need either a rubber band or the elastic strap to hold it on your head.
- We’ll start by putting a little piece of foam in the middle of the 3D-printed visor. (Remember, this is optional; if you do it, that makes it harder to clean. However, a visor that doesn’t have that foam liner is going to be much more uncomfortable to wear for long periods. So choose what works best for you.) Cut the foam to size, and then remove the paper backing from the sticky side and attach it to the visor. Be aware that sometimes, this backing can be tough to remove! Once you’ve got the sticky part exposed, align the foam with the visor and then press down until you have a good seal.
- From here, tape the front end. We’re using half-inch wide 3M mounting tape. It’s pretty easy. Leave a little tiny nub on the end so that it’ll be easier to peel it off; by leaving it there, you can easily just grab it and peel when you’re ready.
- Now we attach the transparent shield. Peel off the external side of the mounting tape, and then put the shield on the front. It should be pretty much exactly the right size. Once it’s on, you really have to pull on it in order to get it back off of there. Push all the way around to ensure that it’s well-sealed.
- Now it’s time to attach the elastic band or rubber band for keeping the mask on. Tie one end to each side (watch the video to see the exact point of attachment, although it’s pretty obvious on the design as well). Loop it and tie it.
- Put it on. It’s got a lot more heft than the Budmen design, but it’s easy and comfortable to wear. When it’s time to clean it, take it apart, wash the components and then reassemble just like before.
Other 3D printing versions
BUDMEN version
The first one we printed. We made a few hundred (thank you!), and are distributing them until they’re gone. Our test clinicians liked it, but it was kind of awkward to put new transparency sheets on it, the holes and pegs were considered potentially harder to clean, and punching those holes manually in the transparencies is a pain (though we found a printing company with a special drill to do it in huge batches).
It’s light and fast to build. It doesn’t require tape. Available at budmen.com or in our dropbox. If your local organizations want this one, go nuts printing and assembling them. It’s a good model, but the hybrid one just was liked better in our tests for more complex situations. And the quick and dirty one is cheaper and faster to produce for similar benefits for the less complex situations, which ultimately is the reason we chose the hybrid one.
Here’s a video tutorial on how to build it.
The University of Iowa Protostudios version
An excellent design intended to be primarily injection-molded for professional use and perhaps within regulatory rules, but we aren’t promising anything. The version in dropbox can be 3d printed with most of the same benefits. It is easily washable, has no elastic strap and only three parts. But some of our test users found it uncomfortable to wear for long periods. The hybrid above uses the similar shield mounting design, but has a more comfortable elastic strap.
NOTE that the holes in the shield diagram are not real. There are no holes in it.
We DO NOT want you to print these, nor do we plan to print lots of these except in special cases – those of us with high volume, high-end printers (or lots of printers of the same kind) that lend themselves to traceability for regulatory reasons. If this describes you, let me know, and I can put you in touch with the right players. But for the most part, you should focus on the hybrid version we recommend above.
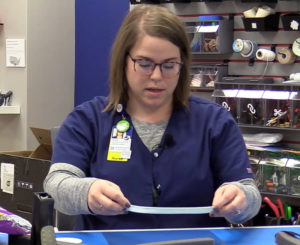
Face Shield 2: Non-3D Printed Version
This is our older design. It works fine, but it’s way harder to produce on a massive scale like the one we just showed you. Still, if you want to build this one, it doesn’t require parts from a 3D printer, just like the one above, so that’s helpful. The materials that you’re going to need include:
- Weatherseal air conditioner foam
This foam comes in a variety of sizes, and a 1 inch by 1 inch product works great. It can be purchased locally at a Home Depot, Lowe’s, or other physical and online hardware stores. - Double-sided adhesive tape
You need something strong and double-sided. Gorilla makes a great version. One side of the tape is going to fit on the foam, so to save yourself from cutting, pick a tape that matches. If the foam is 1 inch wide, pick a 1 inch wide tape. This can also be picked up at Lowe’s and Home Depot, along with craft stores. - Elastic
Each face mask needs 15 inches of elastic. Any width will work. Some hardware stores have this, but you’ll have better luck at a JoAnn Fabrics, Hobby Lobby, or other crafting store. - Scissors
You probably have these in the house (yay!) - Transparency film, or a clear flexible plastic
Did your teacher instruct using an overhead projector? You’re going to use the same material for your mask. Some thin films are available at hardware stores, but you can also get easy-to-use smaller sheets from most office supply stores, like Office Max. - Stapler
You might already have one in the house. Another easy win!
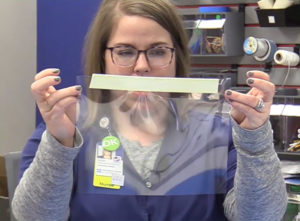
Step One:
Lay the transparency film down on the table in front of you. If you’re using a standard 8.5” x 11” transparency, then you want to place the film in front of you in the landscape, or “wide” direction.
This will make sure the shield wraps completely around your face.
Step Two:
The double-sided adhesive gets placed next. One sticky side of the tape will go directly on the transparency, but it needs to be pre-cut first so that you’ll have about one clear inch on both ends. That means, if you’re using a standard 8.5” x 11” piece of film, you will cut the double-sided tape to measure 9” long. This empty space is where your elastic will eventually go.
Place the double-sided adhesive tape on the very top of the transparency film, centered, so you have that inch of space on either end.
Step Three:
Press the tape down hard against the plastic film to get a solid seal.
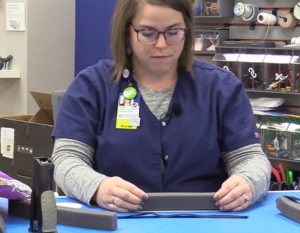
Step Four:
Cut a piece of air conditioner foam to the same length as the tape you’ve placed on the transparency. Again, if you used a standard 8.5” x 11” transparency, this piece of foam is going to measure 9” long.
Step Five:
Remove the covering of the piece of tape that’s facing up, exposing the sticky part.
Step Six:
Attach the foam to the transparency by lining it up to match the tape exactly. Press down hard again to make that seal tight.

Step Seven:
Now it’s time to staple! Attach one end of the elastic band to the uncovered inch of transparency transparency. You might want to use a couple staples to make sure it’s secure.
Step Eight:
Make a loop by stapling the other end of the elastic band to the other exposed inch of plastic film.
Something to take note of…
This shield will not be adjustable, so consider measuring the elastic before you staple it to the plastic. If the elastic is too long, the shield might slip off your face. Of course, you can always unstaple, cut the elastic to a new size and then reconnect it if the fit is too loose. But the shield can only be tightened, not lengthened, so it’s recommended to measure first.
If you’d like to see a video of this mask being assembled, the helpful folks at UnityPoint Health put together this quick tutorial.